
the base.
Last updated: June 2026
MSFS 2024 Xbox controller camera setup. If you’re after smoother cinematic camera shots in Microsoft Flight Simulator 2024, an Xbox controller is one of the best and easiest ways to go. You can still fly with your normal joystick, yoke, throttle, or pedals, but use the Xbox controller purely for camera movement, drone shots, slow pans, screenshots, and video recording.
I’ve been looking at getting back into making flight simulator videos again, and one thing that really stands out in good MSFS videos is the camera work. Smooth pans, gentle fly-bys, slow cockpit movements, and steady external shots can make a simple flight look far more professional.
The good news is that you don’t need a complicated setup to start. A standard wireless Xbox controller can work really well for cinematic camera control in MSFS 2024.
Important Update From My Own Testing
If you use ChasePlane, be aware that it can interfere with the normal MSFS camera controls. In my own testing, the Xbox controller kept acting like an aircraft controller instead of a camera controller, even though the drone camera settings looked correct.
Once I disabled ChasePlane, the controller started working properly with the MSFS camera system. So if your Xbox controller seems to be moving the aircraft instead of the camera, ChasePlane should be one of the first things you check.
Why Use an Xbox Controller for MSFS Camera Shots?
For normal flying, I still prefer proper flight controls. A joystick, yoke, throttle, and pedals feel much more natural for actually controlling the aircraft. But for camera work, an Xbox controller makes a lot of sense.
The thumbsticks are ideal for slow, smooth movement. Instead of stabbing at keyboard keys and getting sudden jumps, you can gently ease the camera around the aircraft or through the cockpit.
An Xbox controller is especially useful for:
- Slow cinematic pans around the aircraft
- Drone camera shots
- Smooth external views
- Cockpit detail shots
- Take-off and landing fly-bys
- Scenic route videos
- YouTube showcase footage
For me, the idea is simple: fly the aircraft with my normal flight sim controls, then use the Xbox controller as a separate camera tool.
What You Need
- A wireless Xbox controller
- A Windows PC with Bluetooth, or an Xbox wireless adapter
- Microsoft Flight Simulator 2024
- Your normal flight sim controls if you use them
- A little patience while setting up the camera controls
You can use the Xbox controller wired with a USB cable if you prefer. In fact, if you have Bluetooth connection issues, using a cable is often the simplest option.
Step 1: Connect the Xbox Controller to Windows
Bluetooth Method
- Turn on the Xbox controller by pressing the Xbox button.
- Hold the small pairing button on the controller until the Xbox light starts flashing.
- On your PC, open Settings.
- Go to Bluetooth & devices.
- Select Add device.
- Choose Bluetooth.
- Select your Xbox controller when it appears.
- Wait until Windows says the controller is connected.
USB Cable Method
- Plug the Xbox controller into the PC using a USB cable.
- Wait for Windows to recognise it.
- Open MSFS 2024 once the controller is detected.
If you are setting this up for video work, I would probably use the most reliable connection possible. If Bluetooth behaves itself, that is fine. If it drops out or feels delayed, use a cable.
Step 2: Check the Controller in MSFS 2024
- Go to Options.
- Open Controls.
- Look for the Xbox controller in the list of connected devices.
- Select the controller.
- Check whether MSFS has assigned a default profile.
In many cases, MSFS will recognise the Xbox controller automatically. If it does, you can start by testing the default assignments before changing anything.
Step 3: Create a Separate Camera Profile
This is very important. I do not recommend using the same Xbox controller profile for both flying and camera work if you already have proper flight controls.
Create a separate profile and name it something simple, such as:
- Cinematic Camera
- Video Camera
- Drone Camera Xbox
The reason is simple. You do not want the Xbox controller moving your aircraft controls when you are trying to film a slow pan or drone shot.
Tip: Set Airplanes Controls to None
If your Xbox controller keeps moving the ailerons or elevators while you are trying to use the camera, check the controller profiles carefully.
In my case, the important fix was setting the Xbox controller’s Airplanes Controls profile to None. Once I did that, the aircraft controls stopped responding to the Xbox controller, and the camera controls started behaving properly.
Step 4: Decide How You Want to Use the Controller
I suggest using the Xbox controller only as a camera controller.
That means:
- Your joystick, yoke, throttle, and pedals control the aircraft
- The Xbox controller controls the camera
- Your keyboard remains available for shortcuts
- Your mouse is still useful for cockpit interaction
This keeps things simple and avoids accidentally moving flight controls while trying to film a video sequence.
Step 5: Setting Up the Drone Camera
The drone camera is one of the best tools for cinematic footage in MSFS 2024. It allows you to move the camera independently of the aircraft. That makes it perfect for dramatic angles, aircraft walk-arounds, runway shots, and smooth fly-bys.
To access the drone camera:
- Start a flight.
- Move your mouse to the top of the screen to open the toolbar.
- Open the camera menu.
- Choose the drone or showcase camera option.
You may also have a keyboard shortcut assigned for drone camera. On many systems this is Insert, but do not assume it is the same on every setup. If it does not work, search your keyboard controls for Drone Camera.
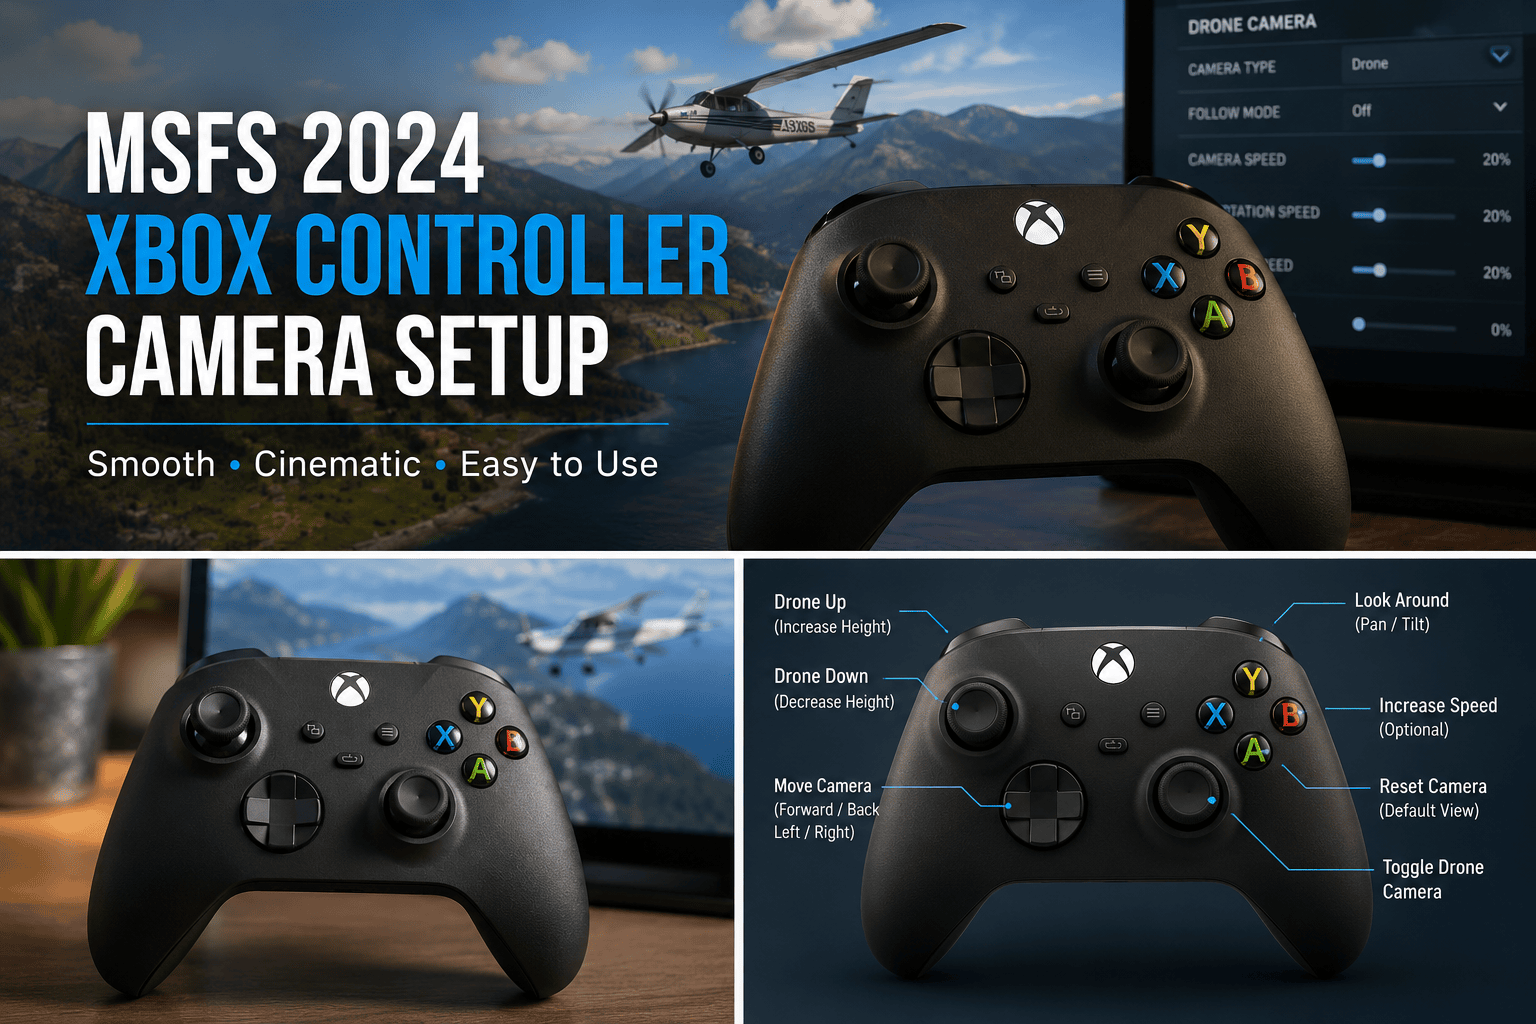
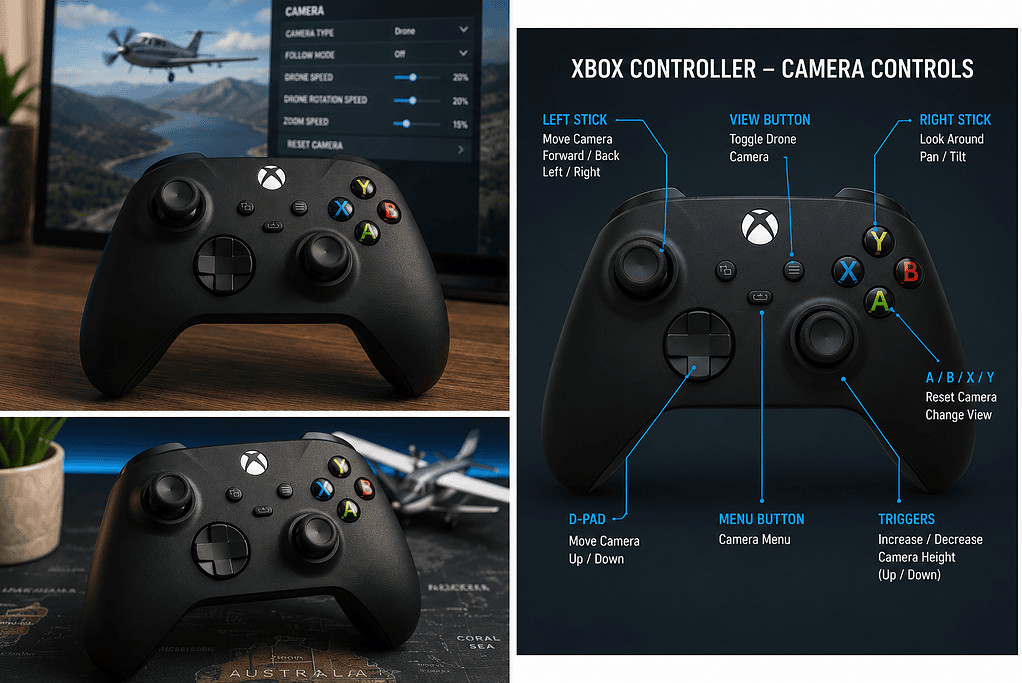
Step 6: Recommended Xbox Controller Camera Layout
This is the basic layout I would use for cinematic filming:
| Controller Input | Camera Function |
|---|---|
| Left Stick X Axis | Drone X Translation Axis / Move left and right |
| Left Stick Y Axis | Drone Y Translation Axis / Move forward and backward |
| Right Stick X Axis | Drone Yaw Axis / Look left and right |
| Right Stick Y Axis | Drone Pitch Axis / Look up and down |
| Left Trigger | Move camera down |
| Right Trigger | Move camera up |
| LB | Decrease drone speed |
| RB | Increase drone speed |
The exact names may vary slightly depending on your MSFS 2024 control screen, but the principle is the same: left stick moves the camera, right stick aims the camera, and the bumpers adjust speed.
Step 7: My Suggested Sensitivity Settings
These are not magic numbers, but they are a good starting point for smoother video work.
Left Stick – Camera Movement
LX – Left Stick Left/Right
- Sensitivity +: -70
- Sensitivity -: -70
- Dead Zone: 5
- Reactivity: 25
- Extremity Dead Zone: 10
LY – Left Stick Forward/Back
- Sensitivity +: -70
- Sensitivity -: -70
- Dead Zone: 5
- Reactivity: 25
- Extremity Dead Zone: 10
Right Stick – Camera Look Around
RX – Right Stick Left/Right
- Sensitivity +: -90
- Sensitivity -: -90
- Dead Zone: 5
- Reactivity: 10
- Extremity Dead Zone: 20
RY – Right Stick Up/Down
- Sensitivity +: -90
- Sensitivity -: -90
- Dead Zone: 5
- Reactivity: 10
- Extremity Dead Zone: 20
If those settings still feel too fast, do not keep endlessly adjusting sensitivity. The bigger setting is often the actual Drone Speed, which is separate from stick sensitivity.
Step 8: Adjust Drone Camera Speed
This is where cinematic camera work really starts to improve.
If the drone camera moves too quickly, your footage will look jerky and rushed. For smooth video, slow is usually better.
Look for these commands in the camera controls:
- Increase Drone Translation Speed
- Decrease Drone Translation Speed
- Increase Drone Rotation Speed
- Decrease Drone Rotation Speed
- Increase Drone Speed
- Decrease Drone Speed
I strongly recommend assigning speed controls to easy buttons, such as:
- LB: Decrease Drone Speed
- RB: Increase Drone Speed
That way, when you are filming, you can quickly slow the drone right down for a gentle pan, then speed it up again when you need to reposition the camera.
The Big Tip
If your camera still feels too fast after changing sensitivity, reduce the Drone Translation Speed and Drone Rotation Speed. These settings often make a bigger difference than controller sensitivity.
Step 9: Turn Off Drone Follow Mode for Free Camera Movement
If the drone camera feels locked to the aircraft, look for an option called Drone Follow Mode or similar.
For many cinematic shots, you will want to turn follow mode off. This allows the camera to move more freely instead of being fixed to the aircraft.
This is especially useful for:
- Aircraft fly-bys
- Runway departure shots
- Landing shots
- Scenic shots where the aircraft passes through the frame
- Static camera views beside the runway
Step 10: Toggle Plane Control
One important camera command in Microsoft Flight Simulator is Toggle Plane Control. This allows you to control the aircraft while you are in drone camera mode.
That can be useful, but it can also cause confusion. If your controller suddenly seems to be controlling the aircraft instead of the camera, this is one of the first things to check.
For smooth video recording, I prefer to keep things simple:
- Set the aircraft up safely first
- Use autopilot where suitable
- Then work the camera
- Avoid trying to hand-fly and film complex shots at the same time
Trying to fly and film at the same time can get messy very quickly, especially near the ground.
Real Pilot Tip
In the real world, you would never let camera work distract you from flying the aircraft. The same idea applies in the simulator if you want smooth and believable footage.
Set the aircraft up first. Trim it, stabilise it, use autopilot if appropriate, and make sure it is doing what you want. Then start working on the camera shot.
Good flying makes good footage easier.
Step 11: ChasePlane and MSFS Camera Controls
This was the biggest lesson from my own setup.
I use ChasePlane, and it is a very useful camera tool. But while setting up the Xbox controller for MSFS 2024 camera work, ChasePlane was clearly affecting the way the controller behaved.
The symptoms were:
- The drone camera appeared to activate
- The mouse could look around
- The Xbox controller still affected aircraft controls
- Keyboard drone movement did not behave as expected
- Camera commands seemed confusing or inconsistent
Once I disabled ChasePlane, the Xbox controller started behaving properly with the native MSFS camera system.
ChasePlane Troubleshooting Tip
If your Xbox controller refuses to work properly with the MSFS Drone Camera, temporarily disable ChasePlane and test again.
You do not have to uninstall it. Just disable it or stop it from controlling the camera, then check whether the native MSFS drone camera starts working properly.
Step 12: Practise Slow Pans
The biggest mistake with cinematic camera movement is going too fast.
For a slow pan:
- Put the aircraft in a stable flight condition.
- Enter drone camera mode.
- Move the right thumbstick very gently.
- Hold the movement steady.
- Avoid sudden corrections.
- Let the aircraft move through the shot naturally.
If the camera movement feels too twitchy, lower the drone camera speed first, then fine-tune sensitivity later.
Step 13: Use the Controller for Scenic Flight Videos
For scenic videos, the Xbox controller is especially useful. You can set up simple shots that make the flight look much more polished.
Good shots to practise
- Slow pan around the parked aircraft before take-off
- Low side view during taxi
- Runway edge view during take-off
- External rear view during climb-out
- Wing view during cruise
- Gentle orbit around the aircraft near the scenery
- A static camera near the runway for landing
These shots are simple, but they can make a video feel much more professional.

Common Mistakes
Moving the camera too quickly
This is the big one. Fast camera moves can make a video look rushed. Slow it down and let the aircraft do most of the work.
Changing views too often
Constantly jumping between views can be distracting. Hold a shot for a few seconds so the viewer can enjoy it.
Trying to fly and film manually at the same time
This can be done, but it is not the easiest way to start. Use autopilot where it makes sense.
Leaving the camera too close to the aircraft
Sometimes pulling the camera back gives a much better sense of scale, especially around mountains, clouds, coastlines, and city scenery.
Ignoring the light
Golden hour lighting can make a massive difference in MSFS. Early morning and late afternoon often look much better than harsh midday light.
Troubleshooting
The Xbox controller is not showing in MSFS 2024
- Check that Windows sees the controller first.
- Try turning Bluetooth off and on again.
- Reconnect the controller.
- Try a USB cable.
- Restart MSFS after connecting the controller.
The Xbox controller moves the aircraft instead of the camera
- Check whether the Xbox controller still has an active Airplanes Controls profile.
- Set Airplanes Controls to None if you only want the controller for camera work.
- Check for aileron, elevator, throttle, and rudder conflicts.
- Temporarily disable ChasePlane and test again.
The drone camera activates but will not move
- Confirm that you are actually in Drone Camera mode.
- Check Drone X Translation Axis and Drone Y Translation Axis assignments.
- Check Drone Follow Mode.
- Check Toggle Plane Control.
- Disable ChasePlane temporarily if you use it.
The camera moves too fast
- Lower Drone Translation Speed.
- Lower Drone Rotation Speed.
- Reduce controller sensitivity.
- Lower reactivity.
- Use smaller thumbstick movements.
- Avoid pushing the stick fully unless you want fast movement.
The camera feels locked to the aircraft
- Check whether Drone Follow Mode is turned on.
- Turn follow mode off for free camera movement.
- Try switching between drone, showcase, and external camera modes.
The aircraft stops responding in drone view
- Use the Toggle Plane Control command if needed.
- Check your key bindings.
- Use autopilot before entering drone mode.
My Simple Cinematic Setup
For my own videos, I like to keep the setup fairly simple:
- Use normal flight controls for flying
- Use the Xbox controller for camera movement
- Use the keyboard for important shortcuts
- Use the mouse for cockpit switches and menus
- Use autopilot for stable shots where appropriate
- Disable ChasePlane if it interferes with the native MSFS camera system
That gives you a nice balance. You are not trying to force one controller to do everything.
Best Type of Flight to Practise With
I would not start with a busy airliner approach into a major airport. That is too much going on at once.
A better way to practise is to choose a simple scenic flight. Pick good weather, use daylight or golden hour, and choose an aircraft that is easy to manage.
For practising camera shots, slower aircraft are often better than fast jets. A Cessna, Daher TBM, Cirrus, or smaller twin gives you more time to set up the shot.
Suggested First Practice Session
- Start on the runway in a small aircraft.
- Set clear weather.
- Choose late afternoon light.
- Take off normally.
- Climb to a safe height.
- Engage autopilot if the aircraft has it.
- Open the drone camera.
- Practise slow pans around the aircraft.
- Try one wing view, one rear view, and one wide scenic shot.
- Record a short test clip and watch it back.
Watching the footage back is important. Sometimes a movement feels slow while you are doing it, but it looks too quick in the final video.
FAQ
Why does my Xbox controller move the aircraft instead of the camera?
Usually because the controller is still assigned to aircraft controls. Check the Xbox controller profile and look for an active Airplanes Controls profile. If you only want the Xbox controller for camera work, set the Airplanes Controls profile to None.
Can ChasePlane interfere with MSFS camera controls?
Yes, it can. In my own testing, ChasePlane was one of the main reasons the Xbox controller did not behave as expected with the native MSFS camera system. Disabling ChasePlane allowed the controller to work properly again.
Do I need ChasePlane for cinematic camera shots?
No. ChasePlane can be useful, but MSFS 2024 already has a powerful camera system. For many simmers, the built-in drone and external camera tools are enough once the Xbox controller is set up properly.
Why does the camera still move too quickly after changing sensitivity?
Because camera speed and stick sensitivity are not always the same thing. If sensitivity changes do not make much difference, reduce Drone Translation Speed and Drone Rotation Speed instead.
Should I use the Xbox controller for flying as well?
You can, but I do not recommend it if you already have a joystick, yoke, throttle, and rudder pedals. I prefer using the Xbox controller purely as a camera tool.
What is the best camera setup for YouTube videos?
Keep it simple. Use your normal flight controls for flying, use the Xbox controller for camera movement, slow the drone speed down, and use autopilot where appropriate. Smooth footage usually comes from stable flying and slow camera movement, not complicated controls.
Final Thoughts
An Xbox controller is a very handy tool for cinematic camera work in Microsoft Flight Simulator 2024. You do not need to use it for flying the aircraft. In fact, I think it makes more sense to use it as a dedicated camera controller.
The key is to slow everything down. Slow pans, gentle camera movements, good lighting, and stable aircraft control will make a bigger difference than complicated editing.
The biggest lesson from my own setup was this: if the controller keeps acting like an aircraft controller, do not keep endlessly changing drone camera settings. Check the aircraft control profile, check for conflicts, and if you use ChasePlane, disable it temporarily and test again.
If you are planning to make MSFS videos for YouTube, setting up an Xbox controller for camera control is well worth doing. It is one of the simplest ways to make your footage look smoother, more polished, and more enjoyable to watch.